Maxim DL is a complete program for the management of CCD cameras and digital cameras. This program contains practically all the tools and utilities that can be of great help for the realization of astronomical images, both for scientific and artistic use.
The program, although not free, is highly recommended, and can be tested by downloading the program, which you have access to for a limited time, from:
http://www.cyanogen.com/downloads/index.htm
In the realization of this tutorial it will be necessary to take into account that the examples cited refer to my specific instrumental, and there may be notable differences with another type of instrumental, and to my personal astronomical preferences.
Configuration
To configure this program click on File – Settings

In the Files tab, we will select the same boxes as in this example, if we want to use the FITS format, in one of the most standard versions that are usually used. There are other possibilities, but particularly, I consider that this selection is one of the most used and compatible with the rest of the programs that we usually use fans (Astroart, Astromet; Astrometrics Etc )
I also recommend using the Fits format against other types of formats, especially thinking about more scientific uses. (photometry and astrometry).
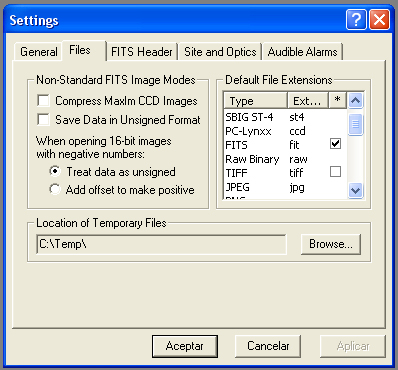
Image capture
To start capturing CCD images with Maxim-DL we will start by clicking on the CCD Control and Telescope control icons
(click View and CCD Control Window)
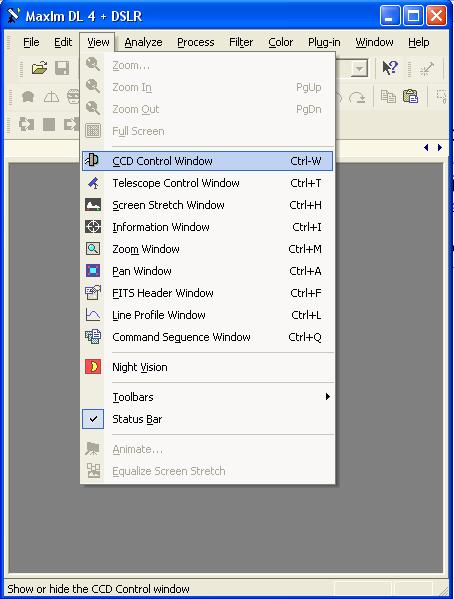
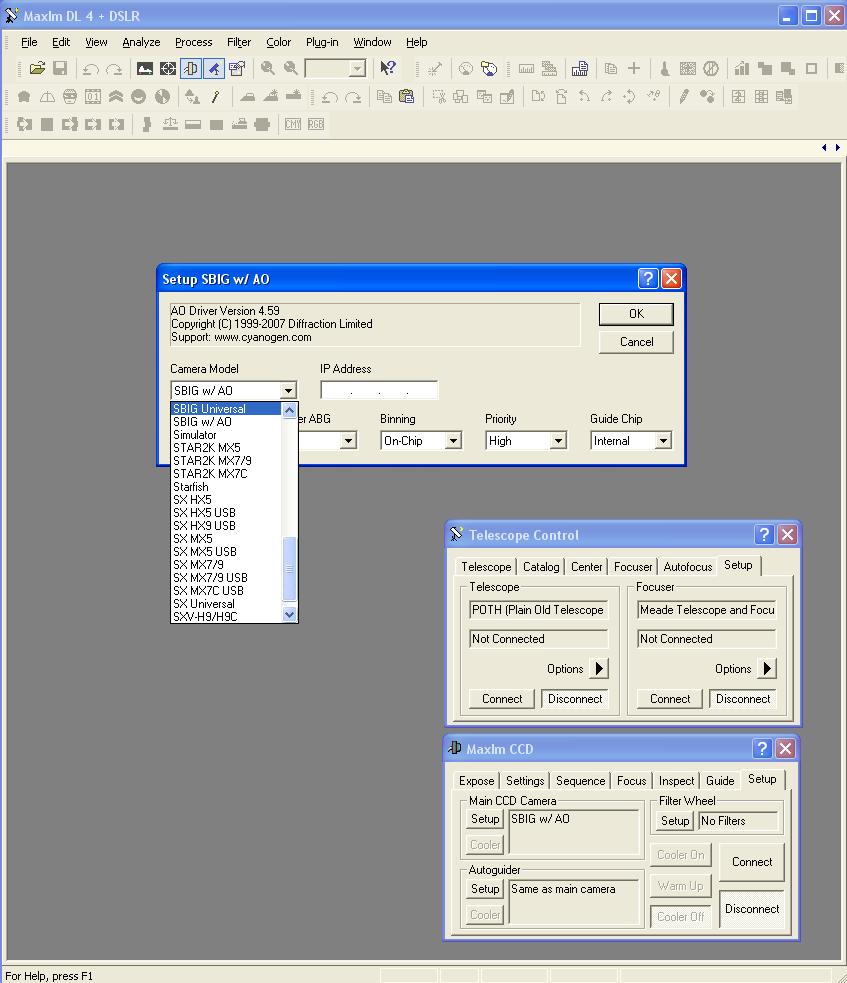
Two windows will appear

On the Maxim CCD screen, we will select the Setup tab. In the setup button under Main CCD Camera, we will choose the camera model we have. Sometimes it will be necessary to previously install the drivers that the manufacturer will provide us and that usually come with the camera.
We will click on connect, and if our camera has temperature control, it will be time to activate the cooling and select the appropriate cooling temperature.
If we have a second camera for guidance we can connect it by clicking on Setup under autoguider. It is possible to command many models of CCD cameras, but also webcams and video cameras that will serve us for guidance.
CONTROL WINDOWS OF THE CCD MAXIM CCD
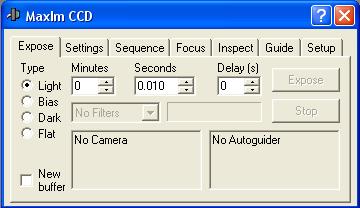
EXPOSE:
In this window we can make the CCD images, although these will not be saved on the hard drive automatically. It is much more comfortable to use the Sequence tab to make our CCD images, as we will see later.
In Type we select the type of images to make: Light Bias Dark Flat (Light for our normal images.)
We will mark new buffer, if we are interested in all the shots we make are seen at the same time on the screen.(not recommended because if we do many the desktop will be filled with images.)
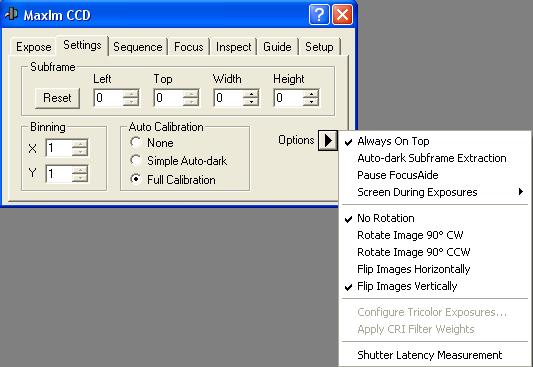
SETTINGS:
This window is used to select the type of calibration that we want in the images.
None : It does not perform any type of calibration.
Simple Autodark : It takes a dark shot that is then automatically subtracted.
Full Calibration : It is the best option that will perform a complete calibration of the images. (we will explain later how to configure it correctly)
In binning we can choose the different modes of binnig 2×2, 3×3 etc, if our CCD allows it.
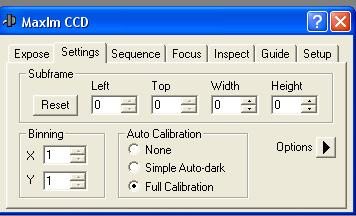
In Options, if we click Always On TOP, the MAXIM CCD window will always appear above the rest of the programs that we have open.
We can change the display of the images that are downloaded from the CCD by checking the corresponding boxes, in this example the images are shown directly on the screen inverted vertically and without rotating.
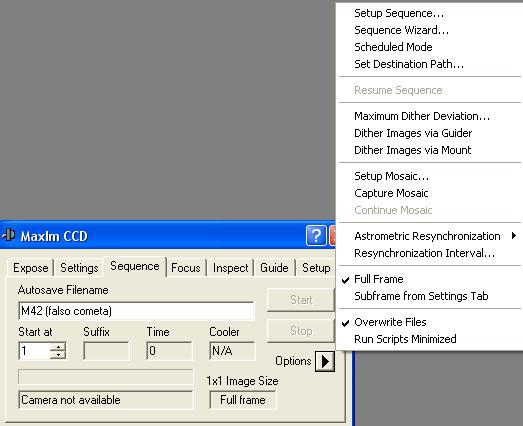
SEQUENCE:
This is the most recommended WINDOW to make our images.
In Autosave Filename we will put the name of the object we want to photograph. Then with the options triangle, we will specify where the images will be saved, what type and duration they will have.
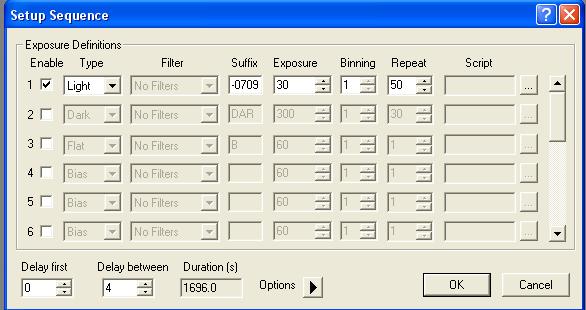
SETUP SEQUENCE
Here we select the following
Type: We choose light for normal shots, or darks bias or flats as it suits us to make the calibration shots.
Filter : If we have a compatible filter wheel, we can mark here the filter we want to use.
Suffix : It serves to put some name or clarification, I usually put the date of the day in this format -071231-
Exposure: We will choose here the exposure time in seconds.
Binning : We will select if we want to use bining 1×1, 2×2 etc always within the possibilities of our CCD.
Repeat : It is simply the number of shots we want to make.
Delay first : It serves to put a delay to the first shot that is made.
Delay between : It serves to put a delay between shots (I usually put a value of 4 or 5 seconds to ensure that the guide star recovers after the dump).
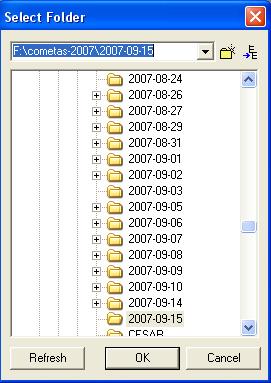
DESTINATION PATH
This window serves to choose the place on our hard drive where the shots of the sequence of images to be made will be recorded.
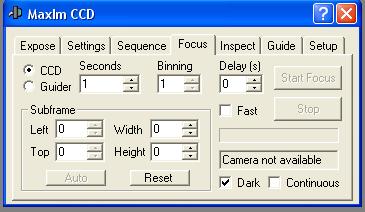
FOCUS
This is the focus window, I usually recommend focusing on the field of the image that we then want to make, normally with 1 second of exposure will be enough. We can focus, either with the whole image, in those cameras with USB, or by framing a star, the latter is the most advisable in cameras with parallel port, because it makes the refresh of the image much faster, speeding up the focus
Ideally we will mark the Dark and Continuous squares, in this way a dark will be applied to the focus taking and new shots will be made continuously.
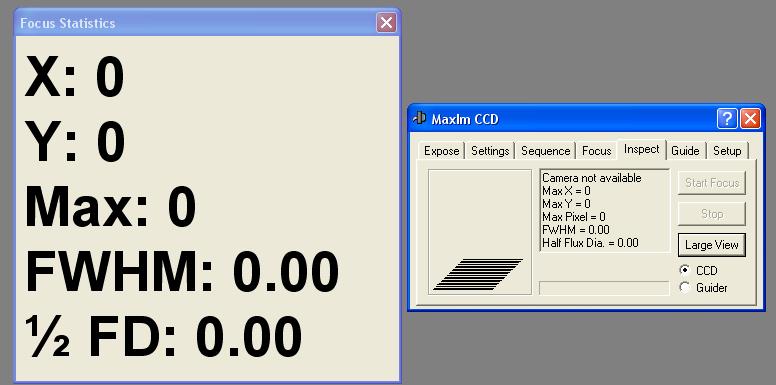
INSPECT
Once we start the focus menu we will open this Inspect window and giving small movements to our focus engine we will monitor that the FWHM value is as low as possible.
If we click Large View simply these numbers will become larger and more visible.
If we have activated the telescope and focus control window (we will see how to do it later) we can focus by clicking on Move in and Move Out.
In Incremental we can be greater numbers if we want a greater path of focus.

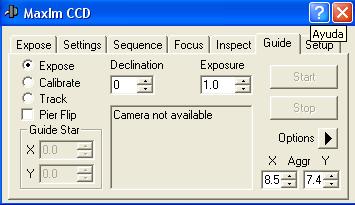
GUIDE
Guide window, (previously we must put a star inside the guidance chip of our CCD. helping us from some planetary program)
Expose : It serves to choose the exposure time of the guidance shots, typically a few seconds or even tenths of a second.
Calibration: This option is used for the CCD-telescope assembly to learn in which directions the axes of right ascension and declination move, within a CCD image.
Track: This option is used to activate the guidance of the telescope.
Declination : In this little window we must put the declination of the guide star. (it will stand alone if we have connected our telescope to Maxim DL)
There are many types of CCDs and telescopes and several guidance systems, to configure it properly we will click on Options and open the GUIDER SETTINGS window.
In control via we will choose the type of “guided” that we have
The most common are:
Guider Relays : For SBIG CCDs and for those cameras with internal relays and ST4 type port
LX200 protocol : It will serve to guide many of the CCD cameras (Atik, Starlight, Luna) on the market in combination with telescopes that accept the LX200 protocol through the serial port of the computer, in COM Port we must indicate which port number it is.
GPUSB and Ascom Direct: among others, will also allow us to guide many of the CCDs and telescopes on the market.
In Cal Time of both the X axis and Y axis we will choose the right time for the correct calibration of the engines.
We must lengthen the time if we see that the star barely moves when we are running CALIBRATE and shorten it if the calibration star leaves the chip during the engine calibration process.
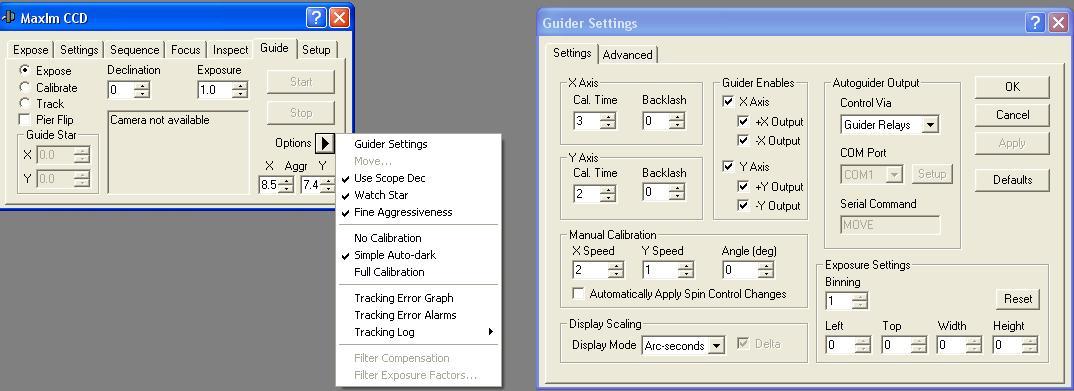
IMAGE CALIBRATION
Maxim DL has a very powerful calibration tool, accessed by clicking on Process and then Set Calibration
For the calibration of images to be correct previously we must have made and saved on our hard drive, in a folder that we could call calibration the following calibration images: BIAS DARKS AND FLATS
BIAS AND DARKS
If you have a camera with temperature control Maxim dl will take it into account and you can and should make bias and darks, at the different temperatures that we will later use (about 50 bias and about 25 darks. Darks should be at least half the maximum exposure time we then plan to use.)
If different BINNINGS are used (1×1 2×2 etc) we must also make the corresponding bias darks and flats for those different configurations
example50 bias at -15ºC50 bias at -20ºC50 bias at -25ºC50 bias at -30ºC 25 darks at -15ºC of 300 seconds of exposure25 darks at -20ºC of 300 seconds of exposure25 darks at -25ºC of 300 seconds of exposure25 darks at -30ºC of 300 seconds of exposure
25 Flats at -15º C
FLATS
The ideal will be to have a high number of FLATS (about 25 would be perfect) at some of the temperatures of which we have DARKS (Flats is not necessary for all the different temperatures that we intend to use). The exposure time of the Flats will be necessary to get 50% of the maximum value of accounts or ADUS approximately. (eye this can vary markedly depending on the models of cameras)
We save all these Bias Darks Flats files together, or in several subfolders, but let them all hang from the same parent folder.
We select this parent folder with the three ellipsis at the bottom right in Source Foulder and then click on Auto-Generate.and to finish we give OK (remember to check the include subfolders box, if the files are saved in several subdirectories.
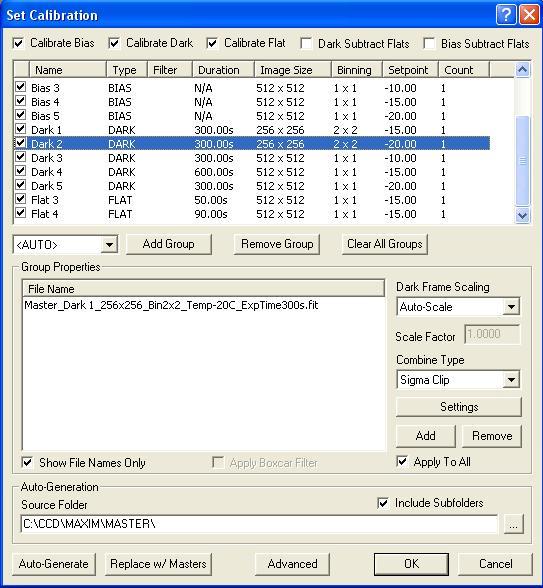
The images will be combined according to some of the methods indicated in combine Type, being Sigma Clip one of the most powerful when we have more than 9 images to combine.
Sigma clip allows several settings that we will access by clicking Settings. According to some experts, it is highly recommended to normalize the results, marking Linear, as in the following example.
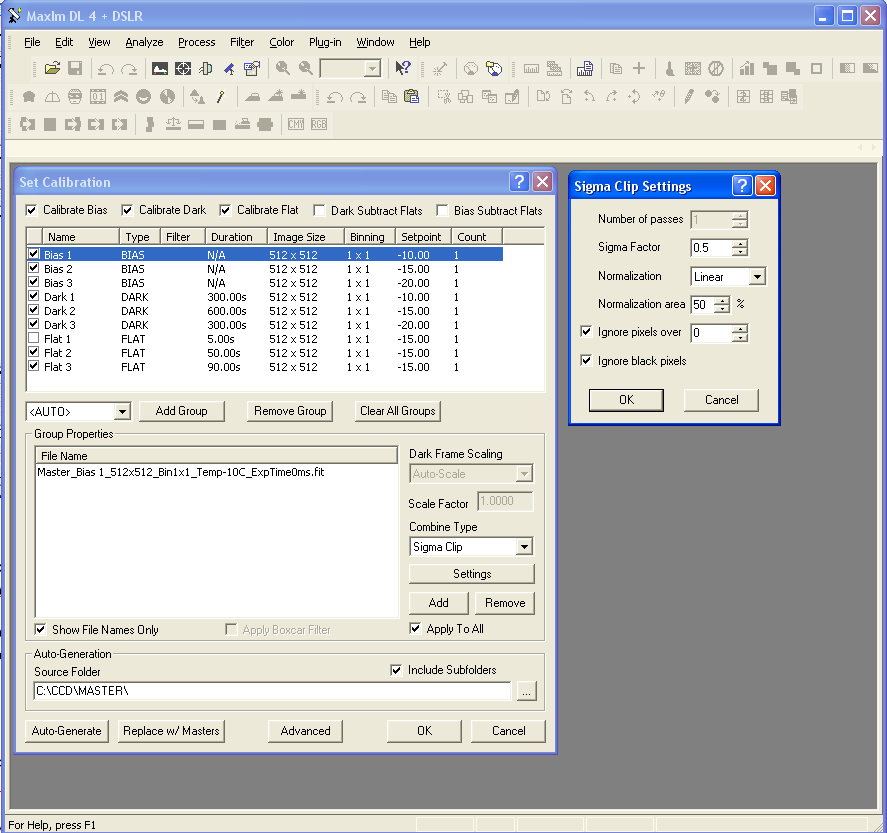
This will allow us to use any exposure time between 0 and twice the time of the DARKS used and if we have selected the full calibration option in MAXIM CCD Settings, the images will be calibrated automatically once they are downloaded from the CCD.
We can also open uncalibrated images and click on PROCESS and then CALIBRATE or CALIBRATE ALL. and these will be calibrated automatically. (the program recognizes if an image has already been previously calibrated).
If we click on Replace w/Master all the images of the same type will be replaced by a single one called Master, this will make the calculations faster.
In cameras with temperature control we can have activated all the Bias and Darks made at different temperatures, without fear that the program is used when applying them correctly.
In cameras without temperature control, in the case of having different collections of Darks for different ambient temperatures, as the program is not able to know at the temperature we work, we must activate or deactivate the bias or Darks boxes (in this example Dark 1, Dark 2 etc) and leave only the bias and Darks boxes that we really want to be applied to the image checked. Of course we will also activate the box of the Flats that we want to be used, which will usually be common for all temperatures.
If we use different filters and we have a filter wheel that Maxim recognizes, and we have made different flats for each filter, these may all be activated, the program will choose which flats to use according to the filter with which they have been made. (we must watch that the information of all this panel is coherent and if we have flats with red filter see how it appears macando network in the corresponding filter box in Filter.
In summary, the program manages to apply the biases and darks that are made at different temperatures in the chambers that have temperature control, and also manages to apply the flats corresponding to the appropriate filter, provided that we have indicated it correctly when making them in the SETUP SEQUENCE window.
At the top we have to leave the following boxes activated: Calibrate bias, calibrate dark, calibrate flat, darks subtracks falts, bias subtrack flats. (In this example the subtracks flats , bias subtrack flats check boxes are not enabled because the flats had already been previously corrected with their respective darks.)
IMAGE STACKING
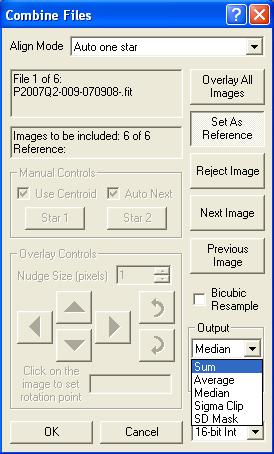
To stack images click on File – Combine files
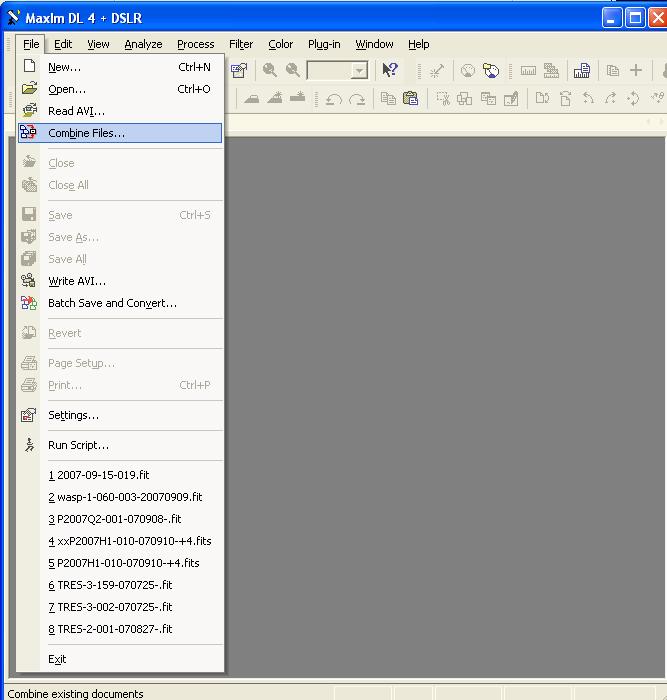
The following window appears, where we will see the directories of our hard drive and choose the images that we want to stack. then we click on Combine.
In File Formatwe choose the format of the images, (fits in this case).

In Align Mode we will choose one of the following alignment modes.
None : only to stack them without any alignment (for darks or flats it can be useful)
Auto-correlationyAuto Star Matching: they seem to work well for linear starry fields, especially the second option.
Manual 1 Stary Manual 2 Star : Manual alignment, I would only use it in fields with very few stars.
Astrometric : Very precise alignment but needs an astrometric catalog such as USNO A2.0 or UCAC 2.0
Planetary : Alignment for planetary (I have never used it, it is supposed to serve to align planetary images)
Auto one Star: Another option in which we choose a star and this is automatically searched to stack the rest of the images.
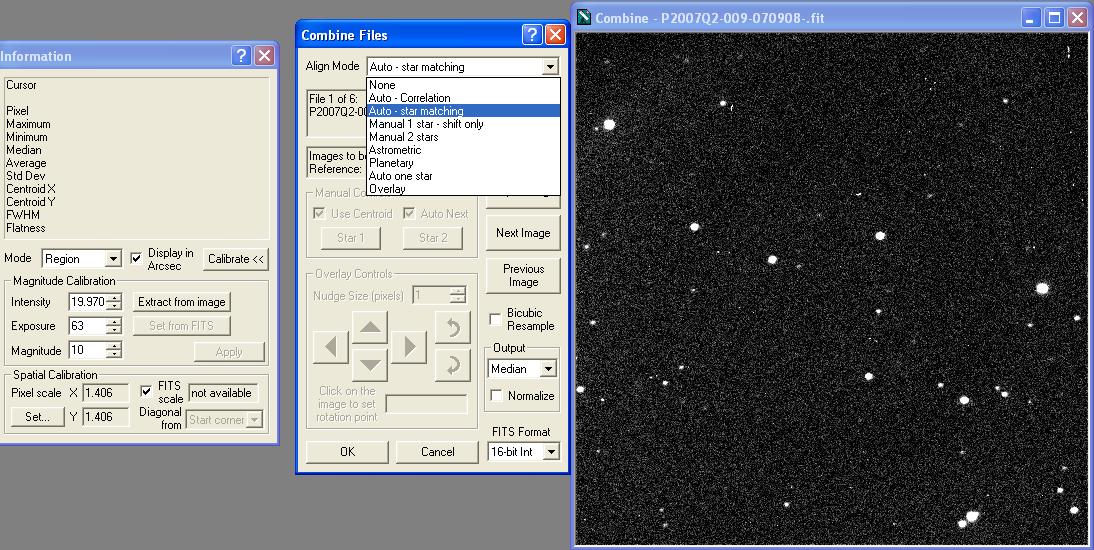
In Output we choose the type of result we want.
Sum : sum of images without more, is usually useful only to stack a few images.
Average : makes an average of the images, for photometric uses it should be useful because it should not alter the results.
Median:. performs the median of the images. In this option, objects or artifacts that appear in a single image are weakened and only what is common in all images is reinforced. It is usually used to stack flats of sky to make disappear the possible stars that appear only in some of the images.
Sigma Clip and SD MasK: They are modern stacking methods that allow to obtain a better final result eliminating artifacts caused by cosmic rays among others.Sigma Clip is widely used in artistic astrophotography but for its correct operation it requires at least 9 images.
TELESCOPE CONTROL
Maxim DL allows you to connect with our telescope and our motorized approach. This has multiple advantages. For example, it allows us to know where the telescope is kicking and save this information in the header fits of the images, being tremendously comfortable for subsequent astrometric analysis, but also for the search for fields and correction of pointing of the telescope.
In case of not knowing exactly where we have pointed the telescope because of an inaccurate GOTO, we can through a CCD image, find with total accuracy where we are pointing the telescope, and if necessary synchronize and repoint again. For the latter we will also need an astrometric catalog such as Usno 2.0 or Uccac 2.
In the focus functions it will even allow us to make use of an autofocus or AUTOFOCUS.
It is highly recommended, almost essential, to install the new version of ASCOM 4.1 (free) because it collects a number of telescopes, cameras and programs compatible with this protocol and that Maxim Dl can govern very efficiently.
To install ASCOM we will visit this link and download the Platform 6.6 that we will install on our computer.
https://ascom-standards.org/Downloads/Index.htm

There are several ways to control the same telescope.
If we have The Sky 5 or 6.0 we can click on Options in the SEPUP window of Telescope Control and then Choose and choose THE SKY CONTROLER, in this way MAXIM DL will be connected with our telescope if it is previously with THE SKY.
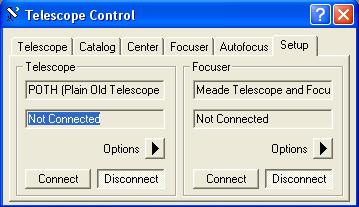
There is a much more powerful way to control the telescope and that does not need the use of a program like THE SKY.We click on Options from the Telescope Control Setup window and then Choose and choose POTH.
POTH is a communications protocol with the telescope that has the advantage that it can be called from several programs at once. That is, in our planetary program we can select POTH and in MAXIM DL too, without more than one serial port being occupied and without both instructions being interfered with.
Once POTH is selected, click on Properties
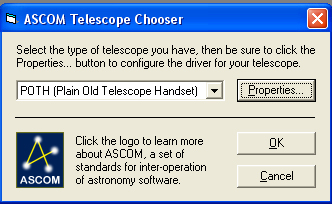
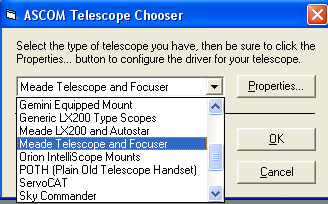
and this screen appears where in Choose Scope we select our telescope from a long list.
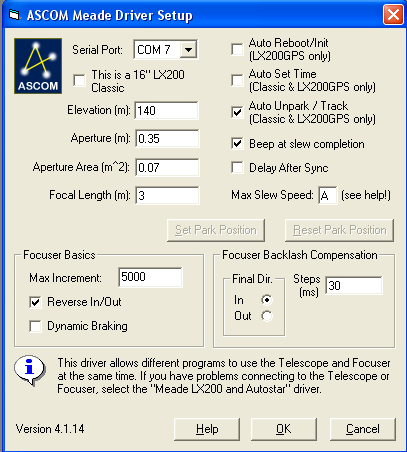
In this specific case and if we have a Meade or an LX200, we choose MEADE TELECOPE AND FOCUSER (even if we have an lx200 with or without gps) This driver has the virtue that it allows to operate a focuser, if it is connected to the telescope.
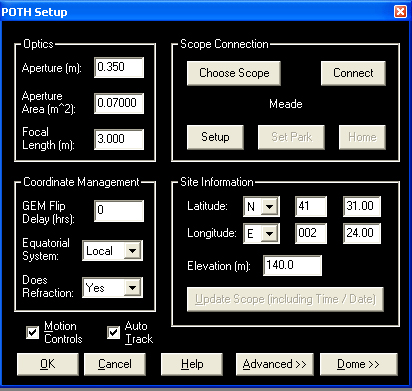
click on Properties in this window:
And we see the configuration window of our telescope in com we select the com used
Focuser Backlash Compensation serves to compensate for the slack of many focusing systems when changing focus directions.
NOTE FOR THE SKY USERS WHO WANT TO USE POTH TO CONTROL THEIR TELESCOPE
1º Install Ascom 4.1
2º copy the TeleAPI file.dll located in C: Program FilesCommon FilesASCOMtelescopePlanetarium Plug_InsTheSky
Copy it to the following path C: Program FilesCommon FilesSystem
In The Sky you must choose TELESCOPI API as a telescope in setup, and then in settings choose POTH, if we have already configured it in Maxim DL, we will already have it configured. If we have not done so, we will follow the same steps as for MAXIM DL. That is, POTH shares the telecopius with THe Sky and maxim Dl, and even with other programs that may interest us such as Guide, or Cartes Du Ciel.
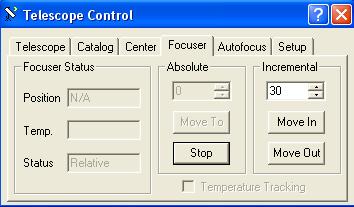
FOCUS CONTROL
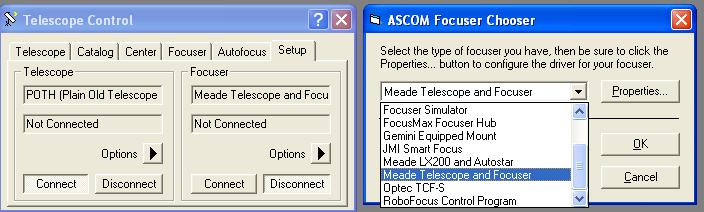
Inside the Control Telescope window, we have Focuser (to the right of Telescope)
If we make options and then choose we are displayed a menu with different focusing devices, here we have directly chosen Meade telecope and Focuser for being the typical device of the LX200.
If we have Focus MAX installed (free autofocus program), we can select this device to control the focus.
From the focuser tab we can focus by clicking on Move in and Move Out. In Incremental we can be greater numbers if we want a greater path of focus.
There is a wide variety of precise focusors that we can govern from this window.